
|

|

|
|
|
|
|
| Home | Manuals | Supplies | Search | Consult | Contact | Testing | Service |


"Removing Strikers" |
|
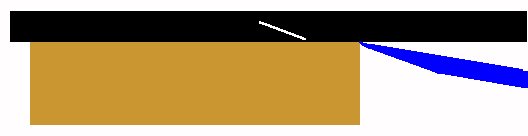
If the cloth on the striker bellows (pneumatics) is at all stiff, it should be replaced. There is no "easy way" to remove the strikers from the tier, but there are techniques for reducing the damage. The one I use most often, when the deck boards (the board that's glued to the tier) are either thin or reluctant to break off cleanly, involves heat. Basically, I cut open the bellows, fold the moveable boards back and out of the way, and then heat the deck boards with a clothes iron (set on Low) for a few minutes. Initially, you need to check how things are going every few minutes. If the board is reluctant to move, heat for a few more minutes. This usually softens the original hide glue to the point where the bellows will come off easily. To avoid warping or accidentally cracking the board in half when I take it off the tier, I use a heavy straight edge (like a chisel) and move the board off sideways. (see diagrams below the video).
Here's the link to the full size video at YouTube
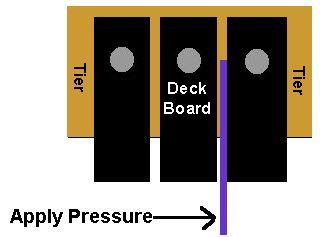
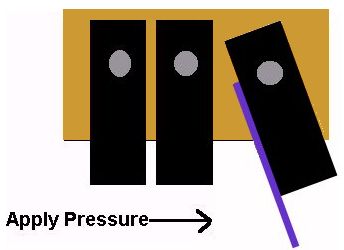 The other more common technique is to chisel the deck boards off of the tier. There are basically two tricks to getting the deck boards off with the minimum of damage. First, using a strong, sharp knife or a thin, sharp chisel, cut away the hide glue around the perimeter of the board. This is quite a bit more important than it might otherwise seem. The reason for removing the glue before attempting to chisel off the board is that the glue creates a very strong bond between the cloth and the tier. Breaking that bond greatly reduces the amount of force needed to remove the board from the tier. A second benefit to removing the glue first is that you are, in effect, scribing a very clear line which shows exactly where the board is located. This makes putting them back 'on' quite a bit easier. (Why this is important -click here.) The second trick is to carefully watch how the board is 'splitting' away from the tier. If it appears to be cracking in the same direction as the chisel angle, attack the bellows from the opposite end. If it seems to be cracking in the same direction again, attack the available side of the board. By attacking the board a little at a time from all possible directions, the amount of breakage will be reduced.
Here's the link to the full size video at YouTube
 Further, I have a basic "Rule of Thumb" when it comes to removing the deck boards. If I break three boards in a row, or if the total number of broken boards reaches six, I use the iron. Mind you, using the iron might not be practical in every case. If the valves and/or the pouches are in close proximity to the deck boards, they will get ruined by the heat. The same is true for any leather gaskets that are close by. So choose your method wisely!! With regards to making sure that the bellows goes back where it belongs, the main reason has to do with the alignment of the sticker wires and striker fingers. If the bellows aren't in the right place, the wires or rods that are connected to the bellows won't be traveling straight up and down. This can cause a few different problems; like rubbing against the bellows on other tiers and/or causing undue wear on the felt bushings in the striker fingers. Lastly, if by chance you are working on a unit that was previously rebuilt, care should be taken to insure that the bellows get put back in the right place. Generally speaking, this can be accomplished by accurately marking the position of the hole in the bellows and then making sure that the hole in the bellows aligns with the hole in the tier. This is accomplished by putting alignment marks (in pencil or chalk) on the outside edges of the bellows and the hole. In some makes of player actions this is extremely important because the valve stems stick out of the chest, and if the bellows is mounted too close to the inside edge, it could prevent the valve from fully opening -creating a large vacuum leak and causing the note not to work properly. When in doubt, the best approach is to clamp a few bellows to a tier before they're glued to the valve chest to make sure that there's clearance between the valve stem and the hinged end of the bellow. Here's an email that arrived on January 26, 2004, and my response. It deals with removing the stationary striker boards when they have been previously glued down with a carpenter's type glue.
|
We Gladly Accept These Cards

![]()
|
Since "Player-Care" is an internet business, I prefer that we correspond via E-Mail (click here to fill out the 'Request Form'). However, if I'm not in the middle of some other activity, you can reach me at 732-840-8787. But please understand that during the hours from 8AM-5PM EST (Mon-Sat), I'm generally quite busy. So, I probably won't answer the phone. If you get the answering machine, please leave a detailed message stating the reason for your call. Also, repeat your name and phone number clearly and distinctly. By necessity, I prioritize everything in my life. And, if you call and just leave your name and number, and ask me to call you back, it might be a day or two before I return your call. Why? Because I don't know why you want me to call and I might not be prepared to assist you in an effective and efficient manner. If you leave me an E-Mail address (which I prefer), spell it out phonetically. The more you do to help me, the more I can help you in return. Don't rush. You have four minutes to record your message. |
|
407 19th Ave, Brick, NJ, 08724 Phone Number 732-840-8787 (Voicemail Only, No Texts) |
