
|

|

|
|
|
|
|
| Home | Manuals | Supplies | Search | Consult | Contact | Testing | Service |


Regulating the |
|
When it comes to performance, there is one major aspect of the player piano that is often overlooked, and that is 'regulation'. And, while I've written about this before in other web pages, it's so important, that I believe it deserves it's own page. In order to make the first two adjustments, the player action must be removed from the piano. Go to: Removing the Player Action. In order to make the last two adjustments, only the stack (or windchest) is put back in the piano. (See NOTE below)
We'll start with the goal. The goal is to make the various adjustments to the action of the piano and the action of the player such that a minimum amount of energy is required to play the notes. There are four primary adjustments that require scrutiny. They are the "lost motion" adjustment (for the piano action and the player action), the "let-off" adjustment (for the piano action), and the "stop-rail" adjustment (for the player action).
Regarding the order in which these adjustments should be made, we start with the adjustment of the piano action. The first adjustment is the lost motion adjustment. As seen in the diagram below, there is a capstan at the end of the piano key. It is used for 'adjusting out' or decreasing the 'free play' (or lost motion) between the parts in the action to a minimum. The blue line shows the path from the key capstan to the hammer butt. When adjusting the capstan, the aim is to remove all of the free space between these parts. Turning the capstan counter clockwise decreases the lost motion. Continue turning the capstan until you see the hammer head start to move away from its resting place against the hammer rail. Then turn the capstan 1/2 turn clockwise. This is done to insure that there is no pressure on the point where the jack makes contact with the hammer butt. To verify that the adjustment is correct, push down on the jack at the point marked 'A' and then release. The jack should go back to its resting place as seen in the diagram. If it does not full return, turn the capstan 1/4 turn clockwise and test again.
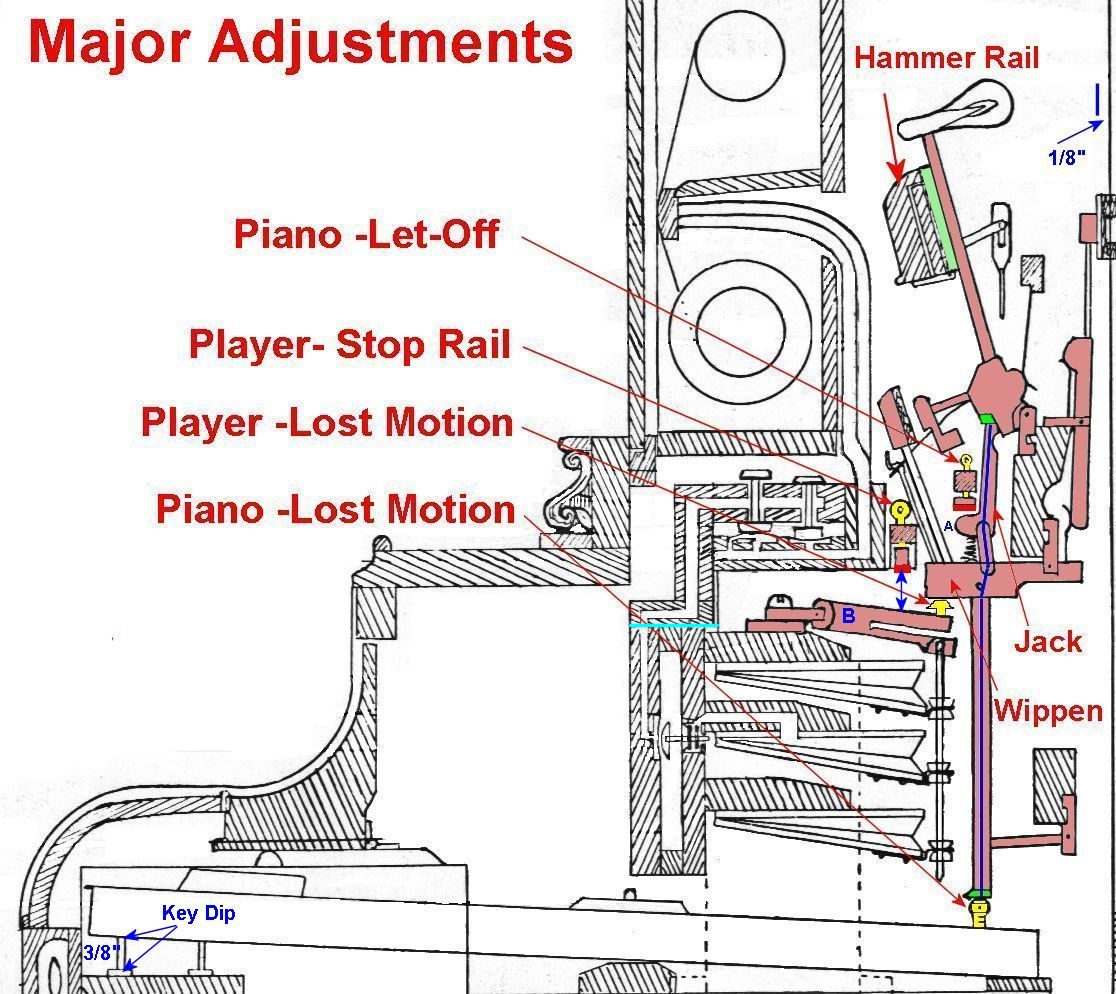 The next adjustment is called the Let-Off adjustment. The purpose of this adjustment is to regulate the point at which the hammer head stops moving forward towards the piano strings. When correctly adjusted, the hammer will move to within 1/8" of the strings and then 'retrace' -or move in the opposite direction (back towards the hammer rail). Making this adjustment requires a 'light' and 'controlled' touch on the piano key. Begin by depressing the key very slowly while watching the hammer closely. Continue pressing the key down until the hammer retraces, and note the distance. (BTW, most hammers will have groves in the face of the hammer from years of striking the strings. When making this adjustment, it's important to consider this fact because the 1/8" space is measured from the string to the point where the hammer makes contact with the string, not the face of the hammer.) Turning the eyelet screw marked 'Piano -Let-Off' in a counter clockwise direction will increase the distance that the hammer travels before achieving let-off. Now we get to the player adjustments. First, the lost motion adjustment. Unlike the piano lost motion adjustment, you DO WANT a small amount of free play between the striker finger (marked 'B' in the diagram). When correctly adjusted, there should be no more that 1/16" and no less than 1/32" of free play between the capstan on the striker finger and the point where the capstan contacts the wippen. Here again, turning the capstan counter clockwise decreases the lost motion. To see a video of this adjustment being done, click here. Lastly, we come to the Stop-Rail adjustment; which might be the most difficult adjustment. Theoretically, it's purpose is to limit the throw of the striker pneumatic such that the pneumatic will not travel any further than the piano key travels. Note the words 'Key Dip' and 3/8" at the front of the piano key. This is how far the key should move to allow the piano action to go through its complete range of motion. Practically speaking, the stop rail adjustment should mimic the key dip. If the striker pneumatic is allowed to travel further than the key travels, this puts undue pressure on various parts of the piano action, which will eventually damage the parts. Fortunately, this adjustment rarely needs attention because it's set at the factory when the piano is assembled and tested, and the felt pad on the adjuster doesn't wear out because there's no friction at that point. It merely stops the striker finger from traveling any further. However, since the stop rail has to be removed when the stack is rebuilt, it's possible that it won't be put back in exactly the same place. The only way to make this adjustment is to compare the action of the keys to the action of the striker fingers. First, press the key all the way down to see where the parts in the action end up. Then pull the striker finger all the way up, and see where the parts in the action end up. The parts should end up in the same place. If not, adjust the stop rail adjustment accordingly. . There have been over 90 different player system manufacturers in the 110 years that player pianos have been in existence. As such, it is outside of the scope of this treatise to explain all of the steps required to separate the stack (or windchest) from the upper section of the player mechanism. That said, the vast majority of manufacturers understood the importance of being able to access the lost motion and stop rail adjustments, and as such, they constructed the upper section so that the platform above the stack, which includes the spoolbox, tracking device, air motor, and primary valve chest (if present), etc., could be disconnected from the upper section. In some cases, finding the right screws can be a little frustrating, and in a few cases, the two section cannot be reasonably separated. If you happen to run into one of these types of actions, write to me and I'll do my best to help you. Return to Top |

![]() ..To
The Top of this Page . . . . . . . . . . .
..To
The Top of this Page . . . . . . . . . . . ![]() ..To The HOME Page
..To The HOME Page
|
Since "Player-Care" is an internet business, I prefer that we correspond via E-Mail (click here to fill out the 'Request Form'). However, if I'm not in the middle of some other activity, you can reach me at 732-840-8787. But please understand that during the hours from 8AM-5PM EST (Mon-Sat), I'm generally quite busy. So, I probably won't answer the phone. If you get the answering machine, please leave a detailed message stating the reason for your call. Also, repeat your name and phone number clearly and distinctly. By necessity, I prioritize everything in my life. And, if you call and just leave your name and number, and ask me to call you back, it might be a day or two before I return your call. Why? Because I don't know why you want me to call and I might not be prepared to assist you in an effective and efficient manner. If you leave me an E-Mail address (which I prefer), spell it out phonetically. The more you do to help me, the more I can help you in return. Don't rush. You have four minutes to record your message. |
|
407 19th Ave, Brick, NJ, 08724 Phone Number 732-840-8787 |