
|

|

|
|
|
|
|
| Home | Manuals | Supplies | Search | Consult | Contact | Testing | Service |


|
|
Hi Mike, I no longer do restoration work. I stopped over two years ago. Honestly, I'm not getting a clear picture concerning the pouches. From your explanation, it almost sounds like the pouches are holding the valves open. The pouches must be dished and the valve button must not be touching the pouch when the valves are at rest. In other words, the pouches should not be level with the pouch board. They should be concave into the pouch well. BTW, do you have a single-valve stack or a double-valve stack? I looked at all the pictures I have and I can't tell.... At this point, I would remove the three note bellows tiers from the valve board. Then I'd put a good tape over all the holes where the tiers were. In other words, I'd eliminate everything from the stack except the pouch board and the valve board. Then I'd secure the pouch board on the valve board. Then I would lay the chest face down on the pouch board. Then I'd very gently push on the valve stems (which stick through the back side of the chest) one at a time to see if they move down at all when I touch them. If they move down even a hair, there's not enough space between the pouch and the valve button. Referring to the attachment (see below), note what it says about the position of the pouch button (I call it the valve button). What some people miss is that it says that the button normally protrudes about 1/8" above the rim of the valve board "with the valves held against the inside seat". Problem is, in the picture the valves are resting against the "outside" seat! So, you would have to lift the valve 'up' for the intake valve facing to be touching the 'inside' seat. If you do that, the button is even higher than the 1/8". This is why I suggest checking the valves as described in the previous paragraph. 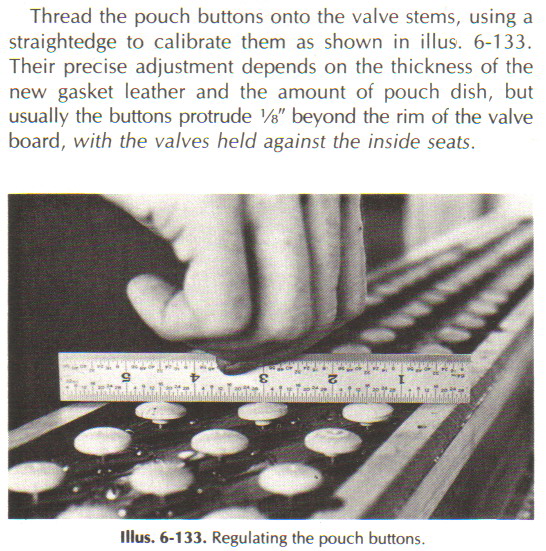 When the valves are at rest against the "inside" seat, the valve button MUST NOT be touching the pouch. There should be 1/16" of clearance between the button and the pouch. Unfortunately, you can't see inside the chest when it's closed. So, how do you measure the distance? What I do first is make sure all of the pouches are in their dished position. I do that by taking a little baby powder on my finger and rubbing it into the pouch leather in a circular fashion as I'm lightly pushing the pouch into the pouch well. Then I take a few 1/16" spacer disks that are about 1/2" in diameter and lay them in the center of the pouch. Then I lay the valve board on top of the pouch board and check to see if any of the valve stems move up when the valve board is placed on the pouch board. Here again, refer to the paragraph about checking for any movement of the valve stem that sticks out the backside of the valve board. Obviously, if any of the valves are being held open by the pouch, the valve button has to be adjusted so the valve is seated against the inside valve seat. One mistake that many people make in their thinking about pouches is that the pouch gets sucked 'down' into the pouch well when vacuum is applied. That is 100% incorrect! What they forget is the bleed. The purpose of the bleed is to make sure that the vacuum pressure above and below the pouch is equal when vacuum is applied. And, since the vacuum level is equal on both sides of the pouch, it doesn't move at all when vacuum is applied. That's why it's so important that there be some amount of clearance (1/16") between the pouch and the valve button. Now, one other thing that's a little more complicated to understand is that the pouch will naturally conform to the valve button over time. This gives the 'unfortunate' appearance that there's no clearance between the pouch and the button. That's why it's important to 'start' testing with the pouched dished down into the well -like they were new. (That's why I suggest the baby powder above.) One last thing, and I only mention it because I made this mistake early in my career. Because of the close proximity of the hinged end of the note bellows to their associated valve stem (see image below), it's possible to prevent the valve from fully opening if the bellows is mounted too far back on the tier. Here again, it's one of those things that's really difficult to see. You just have to imagine that the valve is going to move about 0.040" when it's 'on'. So, it's wise to have about 1/16" of space between the stem and the bellow when the valve is resting against the intake seat. 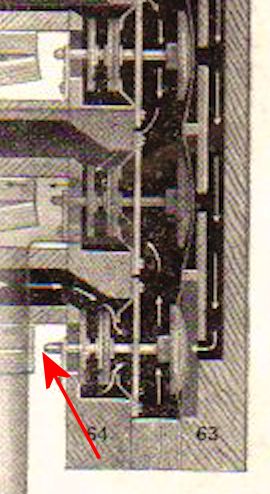 Hope this helps.. John
|

![]() ..To
The Top of this Page . . . . . . . . . . .
..To
The Top of this Page . . . . . . . . . . . ![]() ..To The HOME Page
..To The HOME Page
|
Since "Player-Care" is an internet business, I prefer that we correspond via E-Mail (click here to fill out the 'Request Form'). However, if I'm not in the middle of some other activity, you can reach me at 732-840-8787. But please understand that during the hours from 8AM-5PM EST (Mon-Sat), I'm generally quite busy. So, I probably won't answer the phone. If you get the answering machine, please leave a detailed message stating the reason for your call. Also, repeat your name and phone number clearly and distinctly. By necessity, I prioritize everything in my life. And, if you call and just leave your name and number, and ask me to call you back, it might be a day or two before I return your call. Why? Because I don't know why you want me to call and I might not be prepared to assist you in an effective and efficient manner. If you leave me an E-Mail address (which I prefer), spell it out phonetically. The more you do to help me, the more I can help you in return. Don't rush. You have four minutes to record your message. |
|
407 19th Ave, Brick, NJ, 08724 Phone Number 732-840-8787 (Voicemail Only, No Texts) |
