
|
|
|
 |
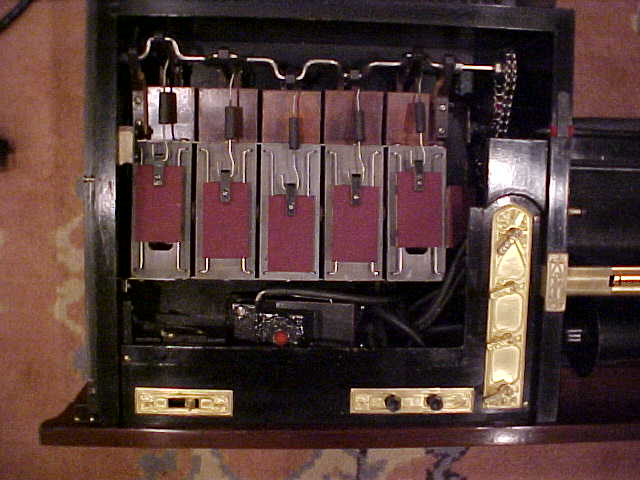
PHOTO E 1 Left side of drawer before restoration Left side of drawer showing air motor, shut off and switches. |
|
PHOTO E 2 Left side of drawer after restoration |
 |
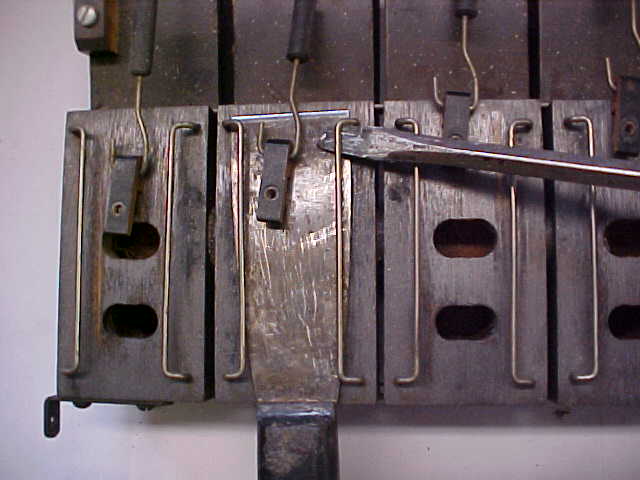 |
PHOTO E 3 Removing air motor slide valve guides. The goal in restoring any air motor is to get it very air tight. To test a restored wind motor for air tightness, cover the vacuum supply nipple while turning the crankshaft backwards. If the crankshaft cannot be turned backwards this indicates that the motor is air tight. Another goal is to make the motor efficient and quiet. The arms must be re-bushed and surfaces of the sliding valves must be resurfaced and re-graphited. Inefficient air motors rob the system of a good deal of vacuum. If an air motor has been restored incorrectly it will be impossible to regulate the governor. Also, a weak motor will stall at the end of long playing rolls. A tight air motor on an 88 note upright foot pumped player will help to make pumping easy. If you are the first person to restore an Ampico grand motor, take the time to mark the two metal strips that hold the five pneumatics together. These strips are not exactly identical, so make marks on the underside of each strip to indicate which strip belongs on the top and bottom and mark each strip left and right. This will help in reassembling the motor. Place a thick putty knife on the face of the motor so that the face of the motor will not be marred and remove the valve guides with a screwdriver as demonstrated in the photo. Number the slide valves on the inside. Often times the four sections that comprise each slide valve need to be re-glued. Sand the cloth off the tops of the sliders and mark the joints 1, 2, 3 and 4. The sliders must be reassembled the same way they came apart. Apply glue to the joints and press the graphited face of each slider onto the quarter inch thick resurfacing plate glass in order to keep the sliding surface flat. |
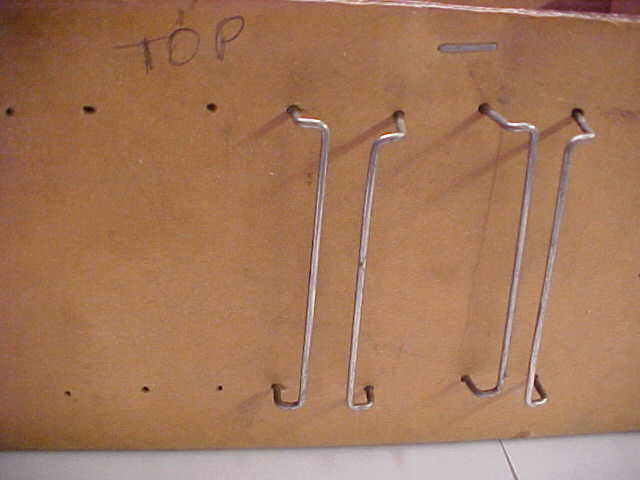 |
PHOTO E 4 Slider guides Press the metal slider guides onto cardboard to keep them in order. Polish the metal with steel wool to make it slick. If these guides are rusty, use 320 sandpaper and then steel wool to shine them up. Do not coat them with finish as this will cause friction. |
|
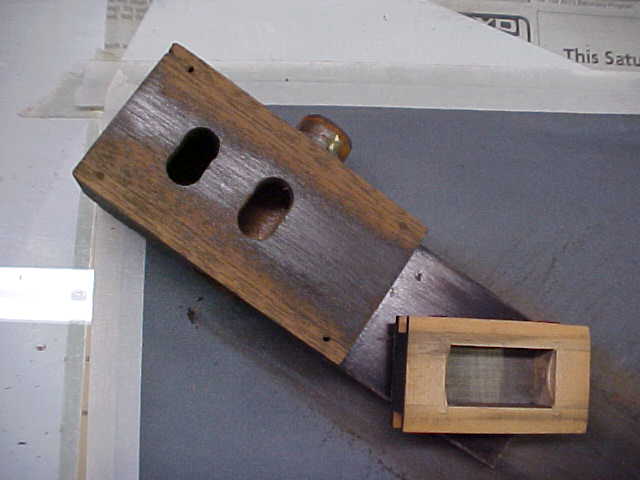
PHOTO E 5 Re-facing Here I'm in the process of re-facing the front of each pneumatic and each slider valve. The pneumatics have been numbered on the back where the crankshaft arm was attached. When the motor is reassembled there will be no visible marks. Separate the five pneumatics. If a metal connecting nipple remains in the side of a pneumatic leave it in. Before re-facing the pneumatics, coat the inside channels with flake shellac and allow it to dry thoroughly. Do not apply shellac to the part of the channel that the connecting nipples go into because this would reduce the size of the opening. This opening will be shellacked when it is time to reassemble the motor. The face of the pneumatic is sanded in the direction of the grain. The slider's face is sanded in the direction in which it travels. I have partially sanded the faces to show how much warping has taken place. Look closely at the slider's face and notice how it has twisted diagonally. The pneumatic's face has a deep depression in the center track. This causes a great deal of vacuum loss and weakens the air motor's power. After the faces have been resurfaced, apply graphite. The face of the air motor is made of wood with deep pores. Graphite must be rubbed across the grain of the wood in order to fill the pores. Fill the pores by rubbing Dag liquid graphite across the grain. Dag is a pre-mixed graphite solution that is used to coat the bridges on pianos. Next, dampen a section of a folded tissue with alcohol and dip this in fine graphite powder. Rub across the grain until there is an even, dark coat on the face. Examine the surface in the light to make sure there are no thick spots. This is a tricky process. Using too much alcohol, or too much pressure, will remove graphite from the face. After a consistent dark color has been attained on the face and the pores are filled, rub dry graphite onto the face in the same direction of the grain. If you have done a good job you will not see any streaks. Applying graphite to the valve faces is a very quick process. One or two swipes of the tissue dampened with alcohol and dipped in graphite is all that is needed. The arms must be re-bushed where they ride on the crankshaft. Use the same high grade bushing cloth that was used to re-bush the pump arms and lubricate these bushings the same as the pump arms using very little lamb tallow and lots of graphite powder. High grade bushing cloth is red on the outside with a white center. On upright Ampico air motors, the arms must be re-bushed on the crankshaft. After they are re-bushed it would be impossible to work them around the bends of the crankshaft without breaking the wooden cylinders that the bushings are glued to. For upright air motor pneumatics, rather then using motor cloth, use key pneumatic cloth or very supple motor cloth. |
 |
 |
PHOTO E 6 Drawer tubing before. This view is of the underside of an unrestored drawer. The access panels have been removed to reveal the lead tubing. Lead tubing must always be replaced in every Ampico drawer regardless of its apparent condition. I have replaced the lead tubing in every drawer I have ever restored and I have been surprised to see the level of deterioration in even the cleanest examples. As the tubing is bent to conform to the structure of the drawer, felt is used to cushion the hard bends. The factory installed this felt to make sure the tubing didn't vibrate against the wood frame of the drawer and cause noise. The area where the lead rests against the felt is the first area to oxidize and yet this is the least visible area. There are usually sections of tubing in this area that have rotted away. Even slight oxidation can cause pinholes to form in the lead. I want to stress the importance of eliminating this source of trouble. A pinhole in a lead tube will send a weak signal to the corresponding valve. This pin hole will allow atmosphere to the pouch and the valve will be slightly lifted off it's seat. This lift of the pouch from a pinhole will not be great enough to lift the valve up high enough to reach the top seat. The pneumatic connected to this valve will not close from this weak signal because the vacuum will pass through the top seat of the valve, and so there may not be any visible evidence of a problem. The compound effect of several valve partially lifted off their seats, will be an extreme loss of power. If the hole in the lead tubing is greater in size than a pinhole, valves will be activated. If you are a new restorer you will probably think that your valves have malfunctioned. This same condition can occur if the replacement tubing is not snug on the tracker bar nipples. This is especially true when tubing the tracker bar in a tight area where one tube is pushing sideways against another tube. If the tubing is not snug it will become egg shaped on the nipple and atmosphere will enter. |
|
This illustration shows a valve that is getting a small signal due to a pinhole in the tubing or new tubing that is not snug to the tracker nipples. The small signal lifts the valve partially off its lower seat. Vacuum is lost through the upper seat without closing the pneumatic. |
 |
 |
PHOTO E 7 Drawer after re-tubing This photo shows a drawer that has been re-tubed in neoprene. I have used hobby type hot melt glue sticks in a hot glue gun to secure the new tubing in place. This makes for a very neat job. Some lots of tubing will stick better than others. Sometimes I have to wipe the powder from the outside of the tubing with steel wool to get it to stick. I use the Vestal Press drawer tubing diagram as a reference for this job. I have re-tubed many drawers and now I manage to get the tubing right the first time. When I first started using this method I would have to give it a couple of tries to get all the tubing to fit. It is difficult to end up with enough space for the end tubes. The tubing must be kept in close, just like the original lead pattern. Start in the middle and install the the lower tier of tubes that rest against the wooden drawer frame. Run glue on the wood in the path of the new tube and stick the tube to the glue while it is in its liquid state. When two tubes are laid on the lower section, run glue in between and on top of these tubes for the top layer just as the original lead was formed. Coming in contact with hot glue can cause a burn, so be careful and take precautions. The hot glue is being applied to the shellacked surface of the wood frame so it can be removed when it has to be replaced. With the new tubing installed the drawer is much lighter and may want to pop out of the rest stop when fully open. Make the new span of tubing that runs from the drawer to the stack generous enough to prevent this from happening. This method is also very helpful when re-tubing upright players. Space is often at a premium in back of an upright spool box in order to have enough clearance for the piano action. I had been using tracker tubing from American Piano Supply for thirty years. Now that Schaff Piano Suuply has purchased American, the tracker tubing I had been using has been discontinued. I have not re-tubed a drawer with Schaff's new tubing, so I'm not sure if it will be compact enough for this job. |
|
|
on November 10, 2022 by John A. Tuttle, who Assumes No Liability For The Accuracy or Validity of the Statements and/or Opinions Expressed within the Pages of the Player-Care Domain. This page was last revised on December 18, 2024. |
|
407 19th Ave, Brick, NJ, 08724 Phone Number 732-840-8787 (Voicemail Only, No Texts) |
