Exposing the Player Mechanism

 | |
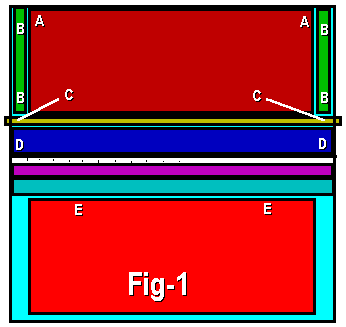
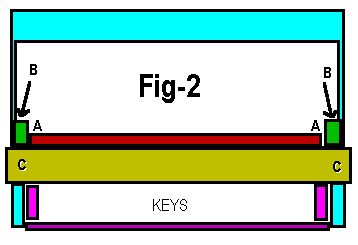
In response to a few requests, I've put together this page to help people find the various screws that must be removed to expose the player mechanism in a typical upright player piano. The following text was extracted from an email that was sent to a customer. For clarity sake, Fig-1 is looking at the front of the piano, and Fig-2 is looking down from the top of the piano.
Attached to this email are two simple drawings to aid you
in removing the wooden pieces from the front of the piano.
It might be best to print out the pictures so you have them
on hand when you are at the piano.

Color Code  ---   Name of the Piece
--------------------------------------------------------------
Light Blue  ---- Frame or Cabinet
Dark Red  ---- Front Board
Red  ---- Bottom Board
Green ---- Shoulders
Yellow/Green  ---- Music Desk
Dark Purple  ---- Key Slip
Purple  ---- Key Blocks
Dark Blue  ---- Fallboard or Key Cover
-------------------------------------------------------------

1) Open the top of the piano and look towards Point A. (Fig-2)
    There you will see some type of clip, hook or slot. Depending
    on what is there, unlatch, or unhook the Front Board from the
    Shoulders. In 99% of all pianos, you should not have to unscrew
    any screws to remove the Front Board.

2) Next, remove both Shoulders. Normally there are two fairly
    large wood screws that holds each Shoulder to the side of the
    Cabinet. Remove all four screws.

3) Next, remove the Music Desk. Normally there is one wood
    screws underneath each Shoulder which can only be seen
    once the Shoulder has been removed. Remove both screws.

4) Next, remove the Fallboard. Normally there are only two screws
    that hold the Fallboard in place and they are located near
    Point D (Fig-1). Also, they are almost always on the back-most
    edge of the Fallboard. The screws are only visible once the
    Music Desk has been removed.


   To remove the Bottom Board, there are normally two springs
   located in the vicinity of Point E (Fig-1). Just push them up
   (or depress them) and then pull the Bottom Board towards
   you from the upper edge (or top) of the board. There are usually
   three or four wooden guide pins that keep the bottom of the
   board in place.

With regards to the levers and controls on the instrument, see
the following webpages:

https://www.player-care.com/how_to_operate.html
https://www.player-care.com/standard_tubing.html
|
We Gladly Accept These Cards


This page was last revised
June 12, 2019 by John A. Tuttle, who Assumes No
Liability
For The Accuracy or Validity of the Statements and/or Opinions
Expressed within the Pages of the Player-Care Domain.
Cartoon Graphics by "Eric Styles"
|
Since "Player-Care" is an internet business, I prefer that we correspond via E-Mail (click here to fill out the 'Request Form'). However, if I'm not in the middle of some other activity, you can reach me at 732-840-8787. But please understand that during the hours from 8AM-5PM EST (Mon-Sat), I'm generally quite busy. So, I probably won't answer the phone. If you get the answering machine, please leave a detailed message stating the reason for your call. Also, repeat your name and phone number clearly and distinctly. By necessity, I prioritize everything in my life. And, if you call and just leave your name and number, and ask me to call you back, it might be a day or two before I return your call. Why? Because I don't know why you want me to call and I might not be prepared to assist you in an effective and efficient manner. If you leave me an E-Mail address (which I prefer), spell it out phonetically. The more you do to help me, the more I can help you in return. Don't rush. You have four minutes to record your message.
|
  |
407 19th Ave, Brick, NJ, 08724
Phone Number 732-840-8787
(Voicemail Only, No Texts)
|
  |
Google Adsense Ad

|


