
|

|

|
|
|
|
|
| Home | Manuals | Supplies | Search | Consult | Contact | Testing | Service |


"Tips and Tricks" Double-Valve
|
|
Below is a graphic that shows one set of components in a common Double-Valve action. A number of manufacturers used double-valve actions for a couple of different reasons. The most widely accepted reason for using a double-valve action has to do with the length of tubing between the trackerbar and the valve that operates the striker pneumatic. The second reason is the belief that a double-valve action has a faster repetitive capability. In this treatise, we will attempt to explain why both reasons are valid. We will also explain the theory of operation and some troubleshooting techniques. NOTE: To learn about the basics of how and why valves in a player piano work -click here.
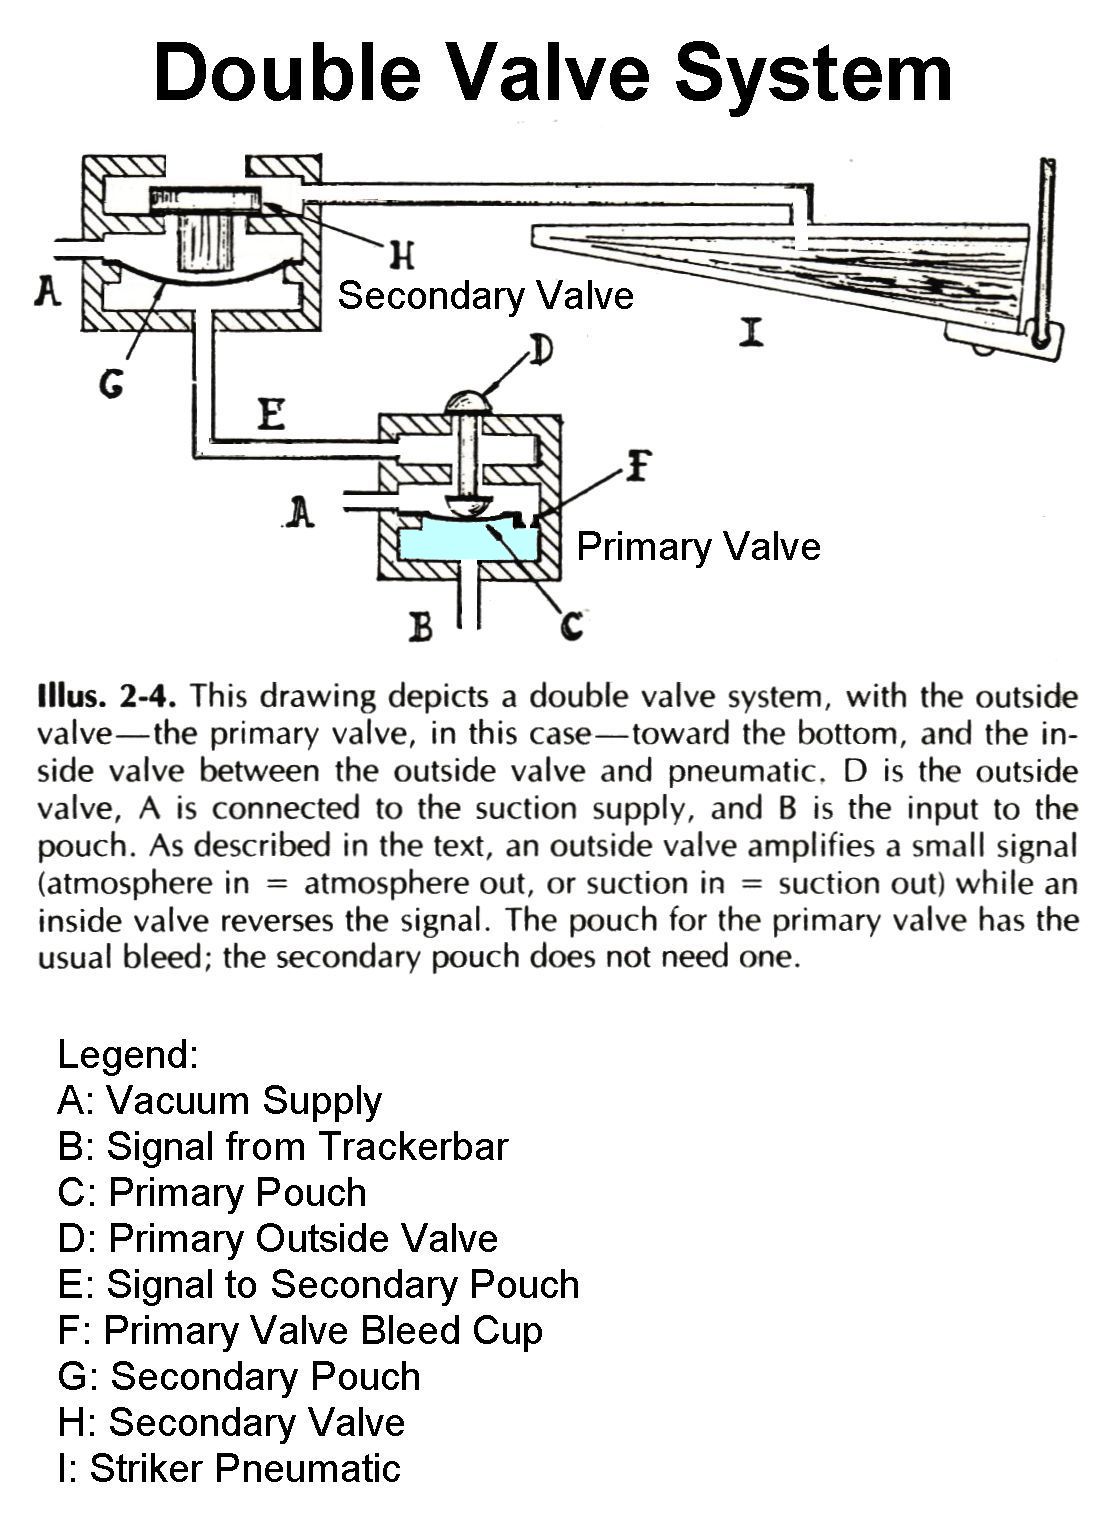
How it works: One aspect of the above sequence of events that is often confusing to people is how the signal from the trackerbar can inflate the primary pouch when the supply vacuum (A) is allowed into the pouch well (shaded in light blue) via the bleed cup (F) at the same time. The reason is relatively simple. If you look closely at the bleed cup (F), you'll notice that the hole leading to the underside of the primary pouch is quite small as compared to the signal hole (B) that's coming from the trackerbar. If fact, the bleed hole is normally six times smaller than the signal hole. So, when the hole in the trackerbar opens, there's about six times more atmosphere traveling into the pouch well than there is vacuum trying to suck the air out of the pouch well. Even if the difference in the ratio is as little as 3:1 (versus 6:1), the pouch will inflate quickly. More on that later. It should be fairly apparent by now that when the primary valve is closed, a small amount of vacuum, via the bleed cup (F), is present at the trackerbar when the hole in the 'bar' is closed. When the hole in the 'bar' is open, the atmosphere tries to neutralize that vacuum. And, since there is a large supply vacuum above the pouch and atmosphere below the pouch, the pouch inflates.
Why It's Needed:
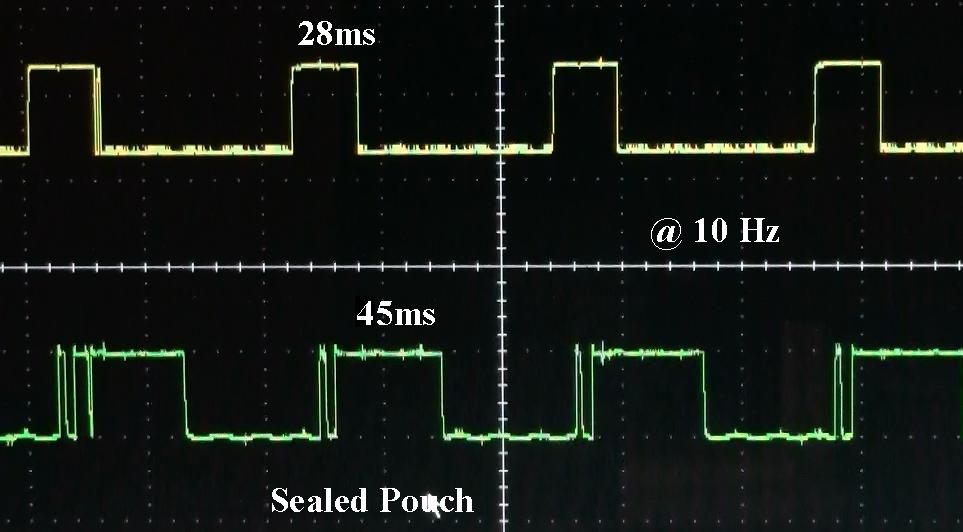
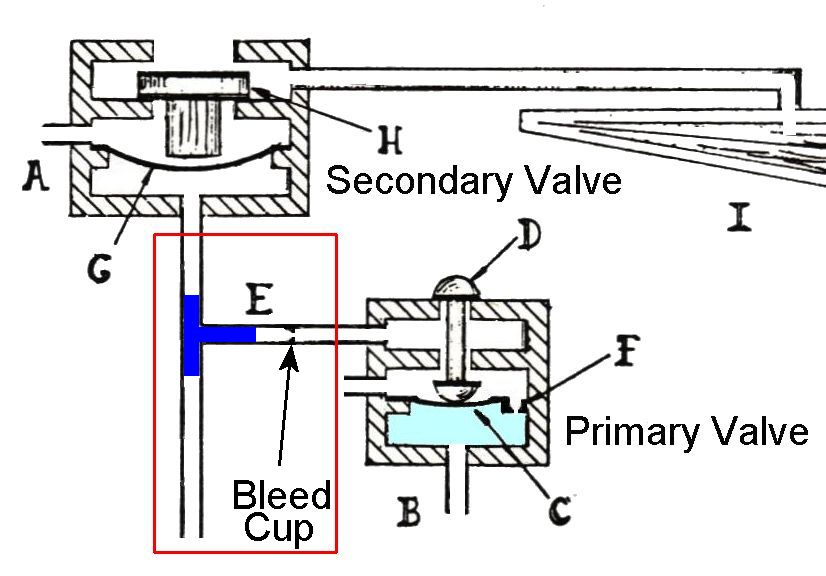
Further, when you consider that the fastest grand piano action has a maximum repetitive capability of 848 cycles per minute (Guinness World Record), it should be fairly obvious that the double-valve action is easily sufficient for playing even the fastest human piano performance. Add to that the fact that the Ampico Test Roll, which is an aggressive test roll, has a repetition test (for all the notes) that uses a repetition rate of only 480 cycles per minute (8 Hz), and you begin to realize that the valves in the player action are more than fast enough to keep up with even the most demanding music. For more information about the pouches in player pianos, see: Pouch Stiffness. This leads to the basic need for a double-valve action. In all player pianos, when talking about the signal from the trackerbar to the valve, there is what's usually referred to as 'line loss'. What this means is that the farther the signal has to travel, the weaker it gets. (I will not attempt to explain why that happens.) As a result of line loss, a large pouch, like the ones found in most single valve actions, struggle to inflate quickly when the distance between the trackerbar and the valve exceeds about four feet. In many reproducing grand pianos, the distance between the trackerbar and the valves is often more than five feet. As a result of this fact and the fact that a larger pouch takes longer to inflate and deflate, these line losses significantly deteriorate the repetitive capability of the player system. Two other points that weren't mentioned previously have to do with (a) the difference in the physical weight of the primary valve as compared to the weight of the secondary valve and (b) the difference in the size of their associated pouches. In all cases, primary valves are at least 50% lighter than secondary valves and primary pouches are at least 30% smaller than secondary pouches. For this reason alone, the primary valve is faster than the secondary valve (all other factors being the same). So, one might ask, 'If the secondary valve is slower, then how is having a faster primary valve of any value?' The answer is relatively simple. First, the dynamics controlling the operation of the two valves is vastly different. The primary valve is controlled by holes in the trackerbar, and the signal which triggers the valve has to travel a relatively long distance. The secondary valve is controlled by the primary valve, which is in very close proximity to the secondary valve (usually just a few inches away). Secondly, and more importantly, the secondary valve has no bleed. So, unlike the primary pouch which has a bleed that is always working against the inflating of the pouch, the secondary pouch is inflated by a 'pure' atmosphere signal that's quite a bit larger by comparison to the signal from the trackerbar to the primary pouch. Also, the pouch is 'deflated' by 100% of the supply vacuum that's in the windchest. In the primary valve, the pouch is deflated by the same vacuum, but it has to travel though the small opening in the bleed cup. As a result, the secondary valve easily operates at exactly the same speed as the primary valve (see Note below). Troubleshooting: Finding problems with the primary valves is relatively straightforward. With all of the signal input and output ports sealed (with duct tape or short air-tight pieces of trackerbar tubing), the primary valve chest should be 100% air-tight. While this is generally not realistic, the chest should be at least 98% air-tight, owing to a small amount of wood leakage, gasket leakage, and valve leakage. Valve leakage can usually be detected with a listening tube that's placed very close to each valve button. And unless the leakage is relatively severe, wood leakage and gasket leakage are extremely difficult to pin-point. When each primary valve is tested (by opening an input port to atmosphere) a vacuum signal should be present at the associated output port, and it should have the same vacuum level as the supply vacuum level. Any drop in the supply vacuum level indicates a leaking valve. The point here is that in order to do effective troubleshooting, you must have an extremely accurate vacuum gauge. Finding problems with the secondary valves can be a little tricky if the primary valves are working correctly. If the vacuum side of the valve is leaking, it's pretty easy to hear the leakage by putting a listening tube next to the exhaust port. If the atmosphere side of the valve is leaking, it's also fairly easy to hear the leakage with a listening tube placed close to the exhaust port. What's difficult to check is the repetitive capability of the secondary valve if the valve is not repeating as quickly as the primary valve. This is because the secondary valve doesn't have a bleed. So, it can't be tested independently unless a bleed is incorporated. Luckily, creating the 'jig' for testing the valve is relatively simple if you have a bleed cup and a little trackerbar tubing. Referring to the diagram below and picture to the right, make a test jig as shown in the picture. Use the piece of tubing that connected the output of the primary valve to the secondary pouch well as the 'upper' leg of the jig. For the center leg, use a new piece of tubing into which a bleed cup has been inserted. This is much easier than one might presume. Simply force the cup into the tubing using the back end of a drill bit of approximately the same diameter as the inside diameter of the cup. The bottom leg is just another new piece of tubing. Connect the jig as shown in the diagram.
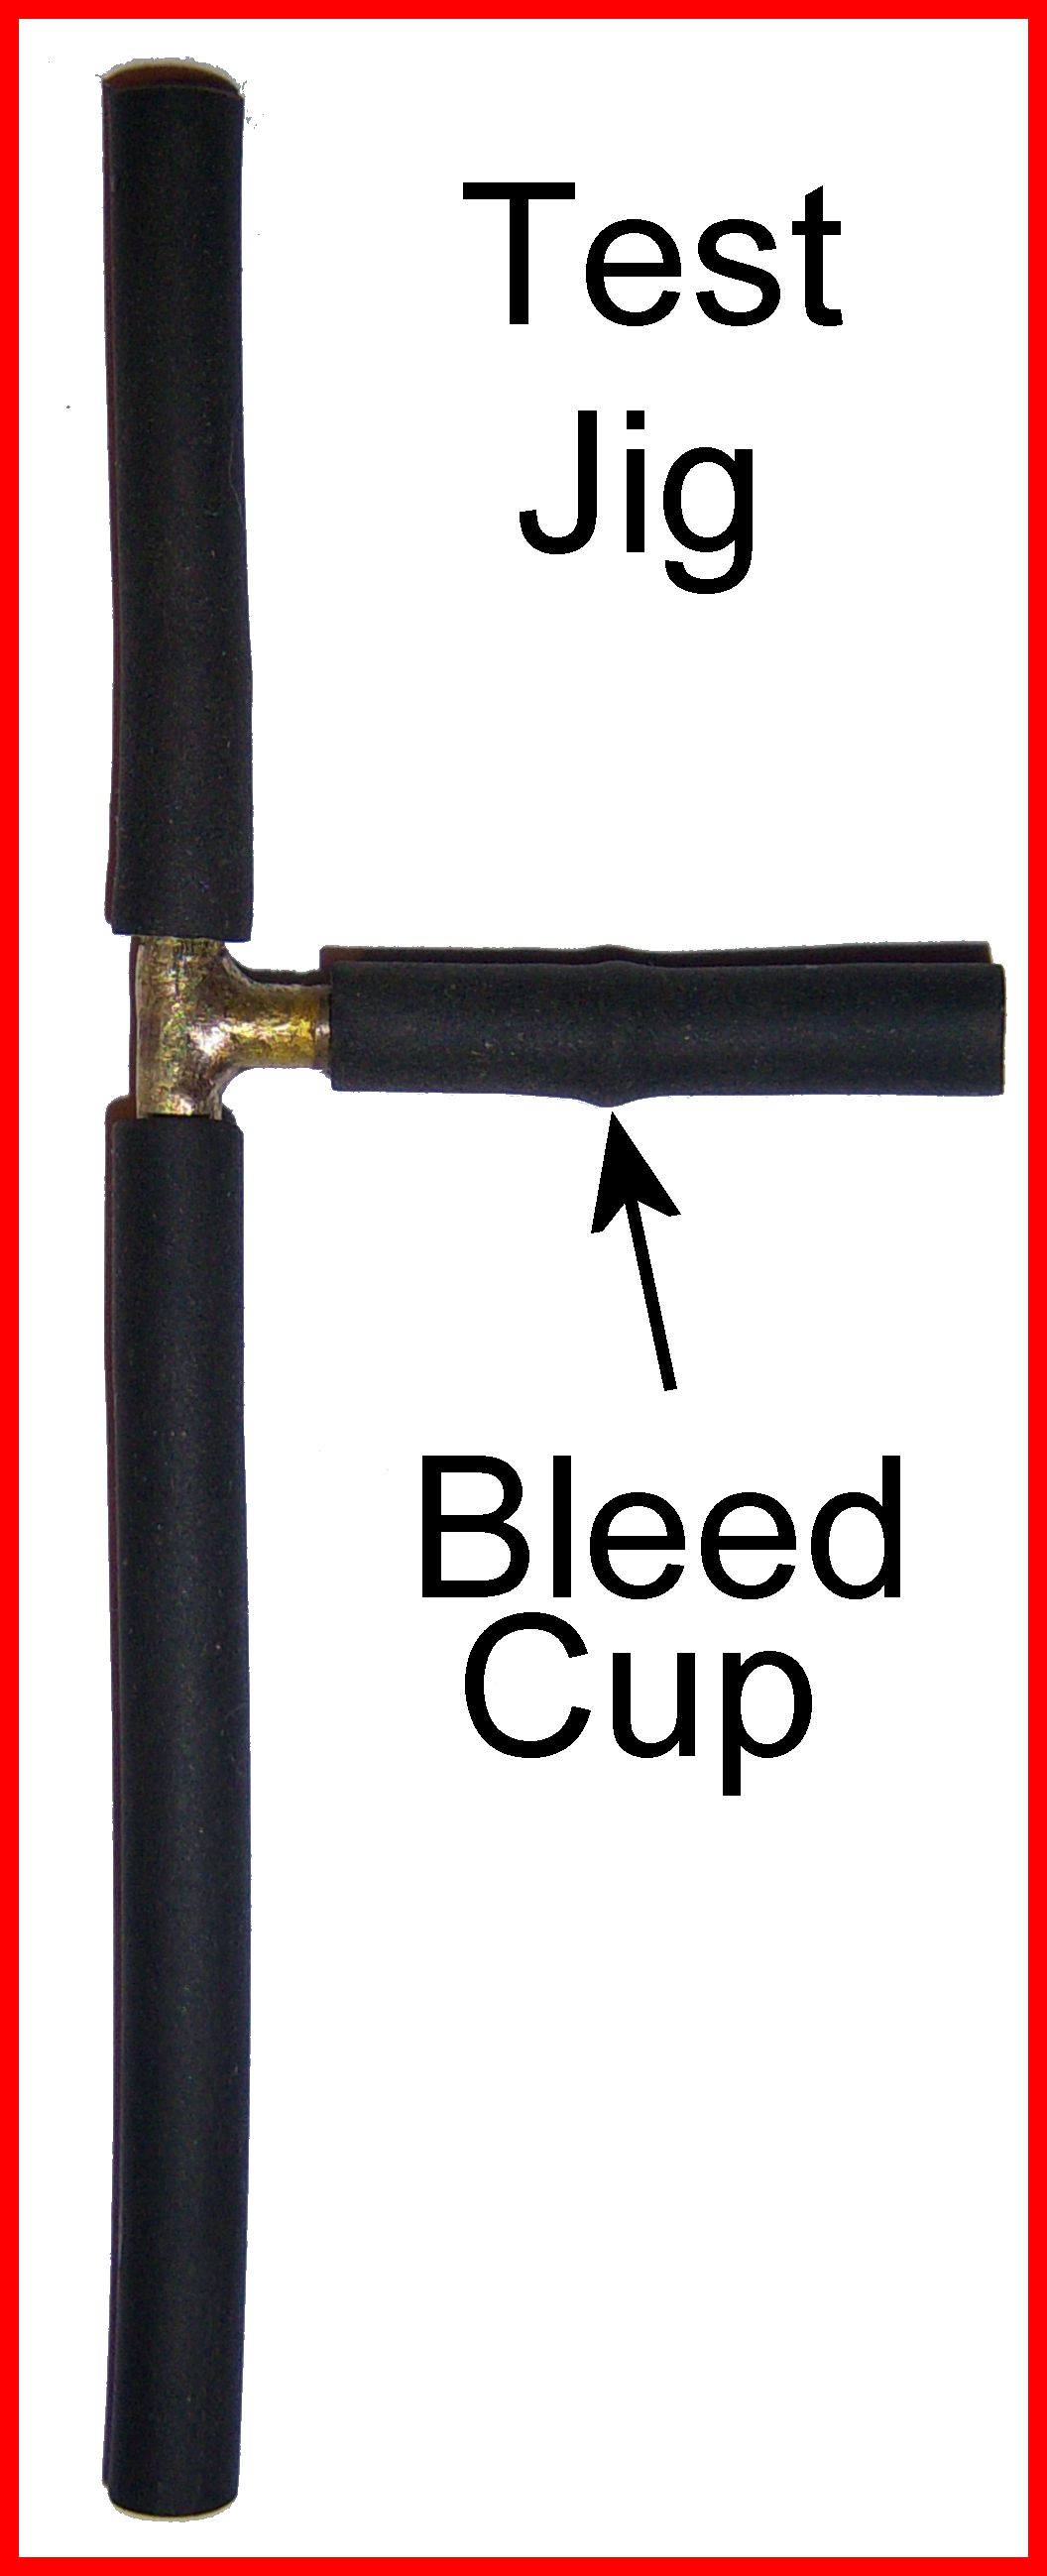
To use the test jig, apply supply vacuum to the primary and secondary valves. Make sure that all of the holes in the trackerbar are well sealed using a piece of blue painter's tape (or other tape that's easily removed without leaving any residue). Once vacuum is applied, the secondary valve should open because the bottom leg of the jig is open, which allows atmosphere into the pouch well, inflating the pouch. Now, using your finger, close the hole in the bottom piece of tubing. In this state, vacuum from the primary valve passes through the bleed cup and deflates the pouch, allowing the valve to close. Next, using your finger again, open and close the hole in the bottom leg of tubing as fast as you can -like you're trying to play a note on the piano as fast as you can. If the secondary valve is in good shape, the note on the piano -to which the valve is associated- should play as fast as the movement of your finger. If it does not, try looking into the valve through the exhaust port to see if the valve is following the movement of your finger. If it is not, there's a problem with the pouch or something is preventing the valve from moving freely. If it is, the problem is associated with the striker pneumatic. Problems with striker pneumatics are more common than you might think. After recovering, very striker pneumatic should be tested before it's glued back in place. For information about testing a striker, click here.
In independent tests, it has been proven that the secondary valve can actually work faster than the primary valve. However, this is only due to the fact that the operating conditions were changed. Specifically, the size of the bleed used to allow the pouch to deflate was increased by 30%, and the length of tubing that allowed atmosphere to enter the pouch well (which causes the pouch to inflate) was reduce to six inches. |

|
Since "Player-Care" is an internet business, I prefer that we correspond via E-Mail (click here to fill out the 'Request Form'). However, if I'm not in the middle of some other activity, you can reach me at 732-840-8787. But please understand that during the hours from 8AM-5PM EST (Mon-Sat), I'm generally quite busy. So, I probably won't answer the phone. If you get the answering machine, please leave a detailed message stating the reason for your call. Also, repeat your name and phone number clearly and distinctly. By necessity, I prioritize everything in my life. And, if you call and just leave your name and number, and ask me to call you back, it might be a day or two before I return your call. Why? Because I don't know why you want me to call and I might not be prepared to assist you in an effective and efficient manner. If you leave me an E-Mail address (which I prefer), spell it out phonetically. The more you do to help me, the more I can help you in return. Don't rush. You have four minutes to record your message. |
|
407 19th Ave, Brick, NJ, 08724 Phone Number 732-840-8787 (Voicemail Only, No Texts) |
