|

|

|

|

|

|
| Home | Manuals | Supplies | Search | Consult | Contact | Testing | Service |
|
|
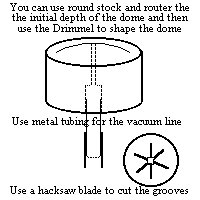
 Cutting the grooves in the tool |
 How the pouch looks after it has been working for a few hours. The leather forms itself to the shape of the valve button. |
|
|
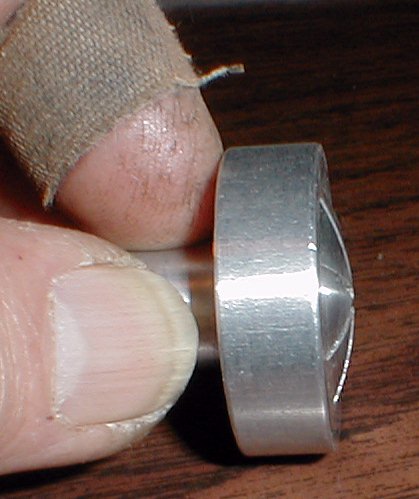
 A side view of the tool |
|
The following is a response to an email (see below) that was received from Paul Masters regarding the problems he was having with the pouches in his Standard stack.
Hi Paul, Understand that the pouches used for operating the valves in a player piano never have to travel more than about 1/8". That's 0.125". That's because the valve only travels 0.040" at most, and there should be 1/16" of free space between the valve button and the pouch (in it's relaxed position -or dished position) when the pouches are new. A dishing tool will set the dish of the pouch at 1/8" (in the center). So, the total travel of the pouch is almost 1/4", or 3-4 times more than what is actually required to make the valve function. (Side note: Over time, the pouches will conform to the valve button on their own. So, within about a year, it will appear that there is no free space between the button and the pouch.) The problem with the synthetic material that Player Piano Co. sold had nothing to do with porosity. The problem was that it suffered from hydrolysis. Within a relatively short period of time (usually less than five years), the material got brittle and cracked, making the pouch useless. Another way to look at it is that it was chemically unstable, and it attracted water molecules. Had it been inert -as was advertised by the manufacturer- it would have lasted for many decades -perhaps forever. As for the contact-type cement (or plastic glue) that was used to glue the pouches in place, I've had more than my share of experience with the product. I found that salon grade Acetone (100%) worked the best to remove all traces of the glue. But, it sounds like you have removed enough of the glue to make gluing with hide glue possible. I would test it to be sure. Lastly, remember that the valve button is in the center of the pouch well, and that the button, when at rest, does not actually go into the well. The button must always be set so that it is ever so slightly above the level of the pouch board. Here's why -and to my knowledge this is not written in any books, but should be-. Consider that we have a flexible membrane that is NOT dished, glued over a can of any size. As long as the air pressure on both sides of that membrane is identical, the membrane will not move. However, as soon as the pressure on one side or the other changes, the membrane will move in the direction of least resistance. So, if we increase the pressure inside the can, the membrane will move outwards towards a lower pressure. This is the primary principle which allows a player piano valve to operate. Now, lets look at the pouch in the player action. At rest, there is an equal amount of vacuum on both sides of the pouch. So, wherever it is most comfortable 'resting' it will stay in that position. That's why we dish the pouch. So it rests at a point which is below the level of the pouch board. The reason we must dish the pouch is because we are NOT going to try to 'stretch' the leather by changing the air pressure. We are merely going to 'tell' the pouch to move to a position which is opposite of where it is at rest. In other words, a position which is opposite of the dished position. Think of it as turning the dish upside down. I won't go into the physics with regards to the amount of force exerted by the changing air pressure, but it is more than sufficient to change the state of the valve even at a difference of just FIVE (5) inches of water vacuum. For detailed data on pressure and vacuum, see:
http://en.wikipedia.org/wiki/Pressure Lastly, it should be mentioned that 'over-dishing' a pouch will also cause problems. That's because the leather has a natural reluctance to being moved at all. After all, it is a solid, and if left to sit without being used, it will develop a 'memory' in the dished position. If that happens, more force (or a higher level of vacuum) will be required to get the pouch to start moving, since it must first overcome the force holding it in place. That's why it's very important to use a player piano with leather pouches quite a bit during its early years. As explained above, the pouch will conform to the button over time. So, it's 'at rest' location in the well will eventually be just a few thousandths of an inch below the position of the button, when it's at rest. I hope this clears things up. Musically, Paul Masters submitted the following email: I have been searching the WEB for a suggestion to this problem. Many of the pages end up at your site where you offer eMail help. Background: This is an upright piano with a Standard player action. When I purchased it 40 years ago, I was told that it said Wurlitzer on it somewhere. I have been over most of it and have not found any indication of the make. Also, according to my research at that time Wurlitzer used their own player action. I played it a lot for a few years and it developed a few problems. So I decided to rebuild it. The pneumatics and bellows appeared to be in good shape, perhaps they had been redone before I bought it. I know enough to be dangerous. I read a number of books and articles on rebuilding players and pianos. Fortunately for me, it appears that the Standard is about the simplest. My father was a piano technician. Unfortunately for me, he wouldn't teach me anything about piano repair. He didn't like players and wouldn't have anything to do with them. I rebuilt the primary and secondary valves. At the suggestion of the parts supplier, I didn't use leather for the secondary pouches. They suggested a plastic item that was more flexible and should last longer. They were attached with 'plastic' glue. After completing the work, the action did not work. All the keys would 'depress' when using a vacuum source, but nothing would happen when it was pumped and a roll was played. I called them about this and they said that they had found that the plastic was porous and therefore would not work. All that was 20 years ago. Now I am retired I have gotten back to the project. (A lot of other things came up in the interim!) I have the leather pouches I should have used in the first place. The situation: There was no problem scraping off the old leather 20 years ago as hide / hot glue had been used. However, it was much more difficult to remove the 'plastic' clue. It was still pliable and didn't want to come off. Fortunately it hadn't 'gone into the wood' like Elmers. I asked around and a person at Lowes suggested using 'Goof Off'. I tried that, which seemed to work, but as I knew from using it before, it liquefies the glue which in this case mostly just thinned out the glue and made it more difficult to remove. I happened on an instrument repair shop which was only for brass instruments. But talking with the person about my problem he said that he had worked with someone who repaired guitars and that person used hot vinegar to remove Elmers clue. I tried that and it worked much better. I was able to scrape off the old clue. I would ask the original supplier, but I have found out that all the knowledgeable people are now retired and so there is no one there to answer questions. They still have most of the parts, but those that are left are only order takers. The problem: Either I was a bit too industrious with the scraping or the grain in the wood was just right, or the vinegar softened the wood, in any case, the small areas between some of the pouch wells have places that are lower than the surrounding wood. As near as I can tell, the widest being about 1/4", a few about 1/8" and most quite a bit less. The 'deepest' is about 2/64 with some about 1/64 and the rest less. I would say about half of the areas are 'damaged', but all it takes is one. The questions: Will this be a problem? I know that the glue for the pouches is supposed to be fairly thin. Will the hot glue fill those spaces? Is there something else I need to do? I have though about wood filler, but I and others, don't know if hot glue will stick properly to it and make an air tight seal. Do you have a suggestion as to how to 'repair' those places? Or do I need to? Thanks for any comments for commiseration. Paul Masters |
| Player Piano Reference Materials - Click Here |

![]() ..To
The Top of this Page . . . . . . . . . . .
..To
The Top of this Page . . . . . . . . . . . ![]() ..To The HOME Page
..To The HOME Page
|
Since "Player-Care" is an internet business, I prefer that we correspond via E-Mail (click here to fill out the 'Request Form'). However, if I'm not in the middle of some other activity, you can reach me at 732-840-8787. But please understand that during the hours from 8AM-5PM EST (Mon-Sat), I'm generally quite busy. So, I probably won't answer the phone. If you get the answering machine, please leave a detailed message stating the reason for your call. Also, repeat your name and phone number clearly and distinctly. By necessity, I prioritize everything in my life. And, if you call and just leave your name and number, and ask me to call you back, it might be a day or two before I return your call. Why? Because I don't know why you want me to call and I might not be prepared to assist you in an effective and efficient manner. If you leave me an E-Mail address (which I prefer), spell it out phonetically. The more you do to help me, the more I can help you in return. Don't rush. You have four minutes to record your message. |
|
407 19th Ave, Brick, NJ, 08724 Phone Number 732-840-8787 (Voicemail Only, No Texts) |
